So this morning I went to put the disc lock in the boot
I have an old blanket I use for kneeling on and to cover the body work if I'm tinkering in the engine bay
I moved the blanket and it was soaking wet, my micro fibre cloths in a box were also soaking as was the box
My heart sank!! I took everything out and the near side boot carpet was soaking as was the boot carpet
Pulled out the floor boot carpet and it just dropped out water
I've now removed the plastic panel and rear quarter side/headlining and discovered where the water has come from, my guesstimate is water is building up around the upper rear light lens self tapping screw plastic grommet which goes into the boot area
Water has gradually dripped down causing the leak
It's never done this before but I had noticed there was a very tiny amount getting in
We've recently had rain and strong wind so that has not helped
Took some photos once I stripped it down to show what I've found
![]()
This is the upper self tapping screw location for the near side rear light cluster
![]()
The white plastic grommet for the self tapping screw clearly dirt and water has got under it. The screw I removed was rotting (no picture)
![]()
The grommet from inside the cabin of the boot area after the trim has been removed
![]()
This is behind the plastic trim where the rear seat belt spool is, clearly there is a water trail and staining on the grey sponge
![]()
More water trail marks running to the boot floor the side carpet touches the panel and this soaked up water first until no more could be held the rest runs to the boot carpet
![]()
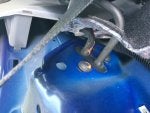
This is the locating pin for the pillar trim/to headlining. This photo clearly shows rust on the clip and how the water has run inside this is where it starts and this clip sits directly below the plastic grommet as first mentioned
![]()
![]()
Rust staining on the trim
![]()
Rear seat latch. Rust started due to the damp in the boot
To me this is worrying and I anticipate the off side will be the same.
If this isn't cured well all I can say is these cars will eventually rot from the inside where it can't be seen until it's too late.
Yeah fair play to those who only use theirs on dry hot sunny days and don't see the rain but mines a daily use car!
I'm going to do a bit more tomorrow and fit new grommets
Something as simple as a bit of poorly fitted plastic can cause this, bad design
I think a rubber seal needs to be fitted under the grommets and a good tight fit.
I can't see (at this time) where else water can leak inside
I'll update the thread if I find out anything else.
Just keep an eye on the boot carpets for damp
I have an old blanket I use for kneeling on and to cover the body work if I'm tinkering in the engine bay
I moved the blanket and it was soaking wet, my micro fibre cloths in a box were also soaking as was the box
My heart sank!! I took everything out and the near side boot carpet was soaking as was the boot carpet
Pulled out the floor boot carpet and it just dropped out water
I've now removed the plastic panel and rear quarter side/headlining and discovered where the water has come from, my guesstimate is water is building up around the upper rear light lens self tapping screw plastic grommet which goes into the boot area
Water has gradually dripped down causing the leak
It's never done this before but I had noticed there was a very tiny amount getting in
We've recently had rain and strong wind so that has not helped
Took some photos once I stripped it down to show what I've found
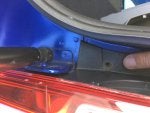
This is the upper self tapping screw location for the near side rear light cluster
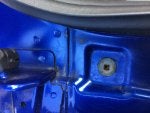
The white plastic grommet for the self tapping screw clearly dirt and water has got under it. The screw I removed was rotting (no picture)

The grommet from inside the cabin of the boot area after the trim has been removed

This is behind the plastic trim where the rear seat belt spool is, clearly there is a water trail and staining on the grey sponge
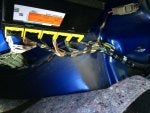
More water trail marks running to the boot floor the side carpet touches the panel and this soaked up water first until no more could be held the rest runs to the boot carpet

This is the locating pin for the pillar trim/to headlining. This photo clearly shows rust on the clip and how the water has run inside this is where it starts and this clip sits directly below the plastic grommet as first mentioned


Rust staining on the trim
Rear seat latch. Rust started due to the damp in the boot
To me this is worrying and I anticipate the off side will be the same.
If this isn't cured well all I can say is these cars will eventually rot from the inside where it can't be seen until it's too late.
Yeah fair play to those who only use theirs on dry hot sunny days and don't see the rain but mines a daily use car!
I'm going to do a bit more tomorrow and fit new grommets
Something as simple as a bit of poorly fitted plastic can cause this, bad design
I think a rubber seal needs to be fitted under the grommets and a good tight fit.
I can't see (at this time) where else water can leak inside
I'll update the thread if I find out anything else.
Just keep an eye on the boot carpets for damp